Subscribe For Free Updates!

We'll not spam mate! We promise.

Showing posts with label C #. Show all posts

Dec 19, 2013

Convert number to words

Views:

Today I will show you how to Convert numbers or Amount in words.

This is simple but mostly used tool / function in many Applications.

It also use in reporting to display amount in words form.

I am writing simple programs which converts numbers into word in Java but can also make it in other languages like C#, Php, JavaScript etc easily.

Mar 13, 2013

Regex Decimal Validation in C# Java

Views:

To day i will show how to Validate a Decimal number through regex.
Regex is very usable expression notation which is approximately same for all Programming Languages (like Java , C#, Python,  JavaScript etc  ) and also it is Very fast as compare to if else Logic. 
I already share how to use Regex in Programming Langues C#.

Feb 17, 2013

Windows Service in C#

Views:

To day i show you how to create, install, Debug and create Setup File of a service in C#.

Windows Service Always run in Background. These    service can perform their define task continuously  with information system user .

Windows Service can Automatically start at start up of windows.We Can perform various type of task from these and windows service are already threaded mean it run parallel with windows other programs.


Feb 16, 2013

Remove all empty tags from XML in Java , C#

Views:

Remove All Empty Tags From  XML in Java , C#
To Day I will show you how to remove all empty tags from XML File or a string Variable that contains  XML data, in both languages C# and Java.

In My Previous tutorial,  I show how to Remove Empty Lines from  a string or from XML Data, After removing empty tags from XML there will be Empty Line in XML data besides these tags. So you must go through this tutorial as well.

In this tutorial Again I will Use Regex Expression to identify empty tags from XML string or File and  replace these empty lines with my respected tags or string  or left them empty.

Feb 15, 2013

Remove Empty Lines from String or XML

Views:

To day I will show you How to Remove Empty Lines from string variable or  string Variable containing XML Data .

This Code will Work on Both C# and Java Language.

In Code I use Reg-ex Expression  To Detect or Find empty lines from String and Replace any other Character , join with Previous line or Else ..

Sep 13, 2012

Object Oriented Programming : Basic Concepts

Views:

Objected Oriented Programming
From Today we will be adding a new Category  in www.visualstudiolearn.com with the Name "Interview Questions".

In this Category we will try to share  all important , Technical and  mostly asked Question by interviewer during Interview or Tests that is faced by fresh graduates when they go for jobs during Interviews at Different Software Houses or I.T forums .

Aug 30, 2012

What is jquery: Select and Move Elements

Views:

jQuery Basic Tutorials and Select and Move Elements
Nowadays  web development technology  is moving forward at a lightning-fast pace, and it’s imperative that developers continue to keep their skills fresh and give a chance to Experience the latest  Technologies .
One of that Latest Technologies is  jQuery.

If you’ve been involved in front-end design or development in any form over the past five years or so, then it’s very likely that you’ve experimented at some point with one of the popular JavaScript libraries like jQuery.
So For Learning jQuery we Must Know Java Script.

Jul 26, 2012

Eamil , Phone number and String Validation in Windows Forms

Views:

Eamil , Phone number and String Validation in Windows Forms
Today I show you how to Validate Email address,Phone or mobile numbers and String validation in Winodows froms c#.

As we in asp.net there is a validation control that can easily validate required String.

Here but use regex Expressions for Email Validations .It is Easy and most widely use Technique .


So let start,
first you have to drag drop Text box And Button on Form Designer Surface .

Created a method like below
bool IsvalidEmail(TextBox Email)
        {
                        if (Email.Text.Trim() != "")
            {
 Match rex = Regex.Match(Email.Text.Trim(' '), "^([0-9a-zA-Z]([-.\\w]*[0-9a-zA-Z])*@([0-9a-zA-Z]"+
        "[-\\w]*[0-9a-zA-Z]\\.)[a-zA-Z]{2,3})$", RegexOptions.IgnoreCase);
                if (rex.Success == false)
                {
                    MessageBox.Show("Please Enter a valid Email-Address ",
                    "Information", MessageBoxButtons.OK, MessageBoxIcon.Information);
                    Email.Focus();
                    return false;
                }
                else
                {
                    return true;
                }
            }
            else

            {
                return true;

            }
        }

And Write this Code In OnClick Eent of Button

        private void btShow_Click(object sender, EventArgs e)
        {
            bool Vaild = IsvalidEmail(txtEmail);
            if (Vaild)
            {
                MessageBox.Show("Email address is Correct");
            }
          
        }

Little Description about REGX

Patter   Description
(@)               Match the @ character. This is the first capturing group.
(.+)               Match one or more occurrences of any character. This is the second
              capturing group.
$               End the match at the end of the string.
|(([0-9a-zA-Z]     If the first character is not a quotation mark, match any alphabetic
                            character from a to z or  any numeric character from 0 to 9.

 AND NOW PHONE NUMBER and STRING VALIDATIONS

It is very Simple and Easy you just Write Below code on KEY_Press Event of a textbox.

 private void txtCellNumber_KeyPress(object sender, KeyPressEventArgs e)
        {
            if (!char.IsNumber(e.KeyChar) && e.KeyChar != (char)Keys.Back && e.KeyChar != '+')
            {
                e.Handled = true;
            }
        }

For String

 private void txtStringValue_KeyPress(object sender, KeyPressEventArgs e)
        {
            if (!char.IsLetter(e.KeyChar))
            {
                e.Handled = true;
            }
        }

Download Soucre Code

Apr 30, 2012

Send and Receive SMS Through AT commands

Views:

Send Sms Through AT commands
AT commands is use to communicate with GSM  Madame and Mobile Phone.There are a lot of libraries which has been made using AT commands and These libraries are not Free it charge money for Using it But Today You learn how to Send and receive sms through AT commands .

Using AT commands you're not restricted to a specific phone model, as long as the phone supports the commands you are using.

This program uses the text mode for sending the message, which is good for starting, but it may not be supported by every phone. If you want to use the PDU mode instead of the text mode - which is supported by all mobiles but is more complicated - see the PDU encoding sample for creating the required data.
Sample source code is available for VB6.
Details about the VB6 sample:
  • Shows how to use the MSComm ActiveX control
  • Shows how to use the SMS AT commands
  • Includes a trace output to see what's going on
  • Includes error handling for common errors
  • Is not optimized for performance

Download
VB6 projectVB6: SendSMS_AT_VB6_20041025.zip

Encoding SMS messages for PDU mode

This demonstrates how to create an SMS-SUBMIT PDU for a simple text message.
Download
VB6 projectVB6: EncodePDU_VB6_20040419.zip
C# projectC#: EncodePDU_CS_20040418.zip
Requires .NET Framework 1.1
Note: This program does only the coding, it does not actually send the message. For testing you can use a terminal program like HyperTerminal (included in Windows) to transfer the encoded message, as given in the following sample:

AT+CMGF=0<CR>
AT+CMGS=<actual PDU length><CR>
<encoded message><EOF>
<CR> = ASCII 13 = ENTER
<EOF> = ASCII 26 = CTRL+Z

Using AT commands to read SMS messages

Using AT commands you're not restricted to a specific phone model, as long as the phone supports the commands you are using.
This program uses the text mode for reading the messages, which is good for learning how it works, but it may not be supported by every phone. You may have to change character sets depending on the characters used in the messages to get the original text back.
Download
C# projectC#: ReadSMS_AT_CS20_20060718.zip
Requires .NET Framework 2.0

Basically there are two ways to send SMS.

  1. Connect a mobile phone or GSM/GPRS modem to a computer / PC. Then use the computer / PC and AT commands to instruct the mobile phone or GSM/GPRS modem to send SMS messages.
  2. Connect the computer / PC to the SMS center (SMSC) or SMS gateway of a wireless carrier or SMS service provider. Then send SMS messages using a protocol / interface supported by the SMSC or SMS gateway.
 In this tutorial we'll use first method. We can send SmS through AT commands, AT commands are instructions to Send/Receive SMS. (for more detail about AT Commands wait for my Next Post about AT commands).

Lets Start..
Step-1
Open Visual Studio, Create a New Project with the Name SMS. (In this tutorial I'm not going to show you how to create a new project, I'm skipping the detail about it.)

Step-2
In the solution Explorer, Right Click on the Project and Click on Add -> Add New Item and Add New Class with the name SmsClass.cs copy the following code in the class.

SmsClass.cs

using System;
using System.Collections.Generic;
using System.Text;
using System.Threading;
using System.IO.Ports;
using System.Windows.Forms;
namespace SMS
{
    class SmsClass
    {
        SerialPort serialPort;
        public SmsClass(string comPort)
        {
            this.serialPort = new SerialPort();
            this.serialPort.PortName = comPort;
            this.serialPort.BaudRate = 9600;
            this.serialPort.Parity = Parity.None;
            this.serialPort.DataBits = 8;
            this.serialPort.StopBits = StopBits.One;
            this.serialPort.Handshake = Handshake.RequestToSend;
            this.serialPort.DtrEnable = true;
            this.serialPort.RtsEnable = true;
            this.serialPort.NewLine = System.Environment.NewLine;
        }
        public bool sendSms(string cellNo, string sms)
        {
            string messages = null;
            messages = sms;
            if (this.serialPort.IsOpen == true)
            {
                try
                {
                    this.serialPort.WriteLine("AT" + (char)(13));
                    Thread.Sleep(4);
                    this.serialPort.WriteLine("AT+CMGF=1" + (char)(13));
                    Thread.Sleep(5);
                    this.serialPort.WriteLine("AT+CMGS=\"" + cellNo + "\"");
                    Thread.Sleep(10);
                    this.serialPort.WriteLine(">" + messages + (char)(26));
                }
                catch (Exception ex)
                {
                    MessageBox.Show(ex.Source);
                }
                return true;
            }
            else
                return false;
        }

        public void Opens()
        {
            if (this.serialPort.IsOpen == false)
            {
                this.serialPort.Open();
            }
        }
        public void Closes()
        {
            if (this.serialPort.IsOpen == true)
            {
                this.serialPort.Close();
            }
        }
    }
}
Step-3
Now on the Form1, we'll use
  1. combo Box (cboPorts) which will show the available ports on the computer.
  2. Two TextBoxes One for Receivers Cell No. (txtphone) and other for Message body (txtMessage) with Multiline property set to True.
  3. Send Button (btnSend) to Send SMS.
 Step-4
Copy and Paste the following code in the Form1 Code.
Form1
using System;
using System.Collections.Generic;
using System.ComponentModel;
using System.Data;
using System.Drawing;
using System.Text;
using System.Windows.Forms;
using System.IO.Ports;
namespace SMS
{
    public partial class Form1 : Form
    {
        public Form1()
        {
            InitializeComponent();
            loadPorts();
        }
        private void loadPorts()
        {
            string[] ports = SerialPort.GetPortNames();
            foreach (string port in ports)
            {
                cboPorts.Items.Add(port);
            }
        }
        private void btnSend_Click(object sender, EventArgs e)
        {
            SmsClass sm = new SmsClass(cboPorts.Text);
            sm.Opens();
            sm.sendSms(txtPhone.Text, txtMessage.Text);
            sm.Closes();
            MessageBox.Show("Message Sent!");
        }

      
    }
}
Now , You Just need to connect your GSM modem/mobile to your PC through USB or Serial cable.
and Run the Project. From the main Window Select COM Port  on which your Modem/Phone is Connected to.

Note: This application is Tested using Nokia N82 By Me...

Download Source Code:
http://www.multiupload.com/1E2JGHS1ZF


Apr 29, 2012

ActiveXperts SMS and MMS Toolkit for .NET

Views:

http://mcore-net-sms-library-lite.ig-logix-softech-pvt-ltd.qarchive.org/mainscreen350.pngActiveXperts is a tool kit or library used in Dot net framework for Sending and Receiving  SMS and MMS .
By Using this tool kit you can Add SMS and MMS capabilities to any Windows or .NET application.

This SMS and MMS Toolkit is toolkit to provide SMS and MMS messaging functionality to Windows software developers. With ActiveXperts SMS and MMS Toolkit, you can send and receive SMS messages (including WAP, ringtones, picture messages) via a:


How to make Asp .NET web Service Soap service

Views:

http://sharepointmagazine.net/wp-content/uploads/2008/11/image16.png
Web services very use full technology .It Mostly used  in Coors plate form  work .By using web service we  can perform most of remote work. for example if we have web sites web1 and web2 and we want to share it data ten most selling Product of web 2 to web 1 then would we could do for this we make a web service on web 2  and though service URL we can access data and all method .We can also use web service on smart phone and Windows Phone7 ,android and iPhone etc .
So , let Start make First Web Service .
 we use Visual Studio 2010 for making web service


To create the new Web Service:
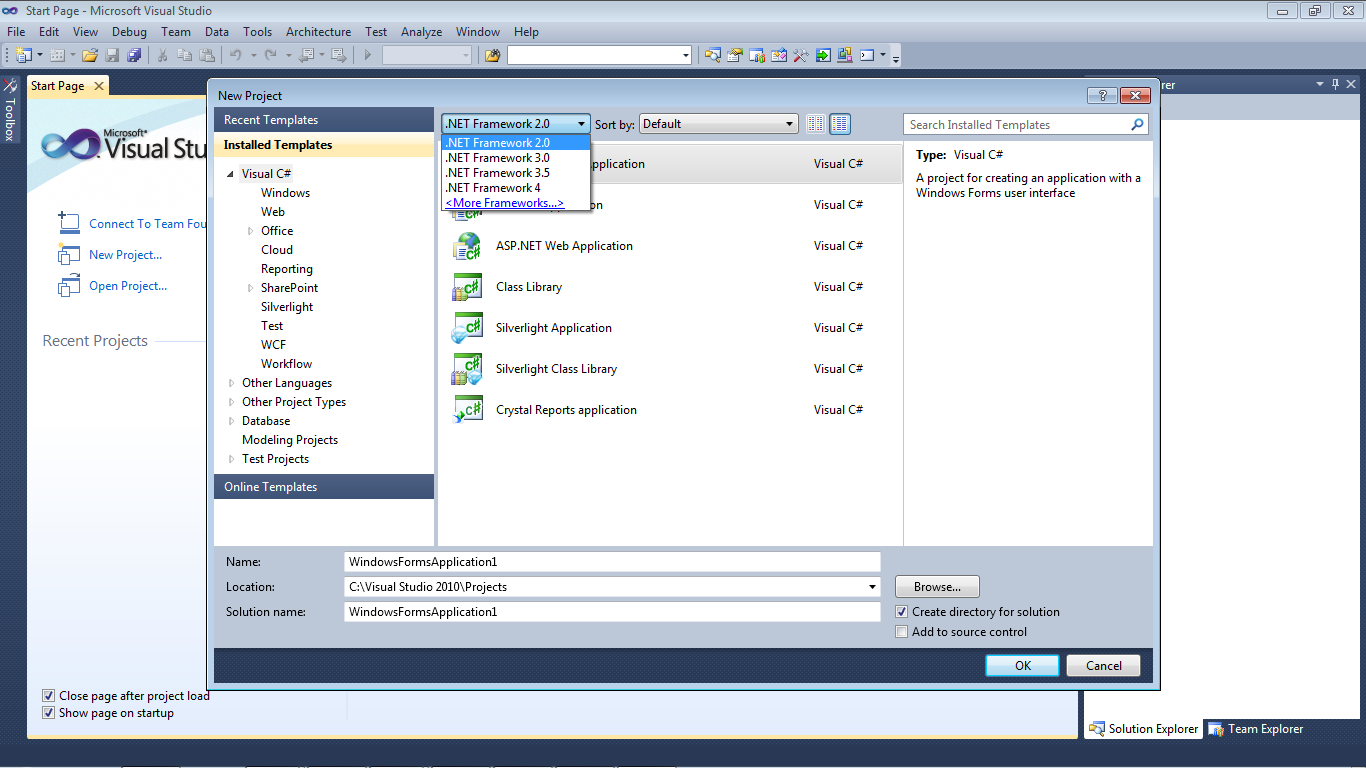
  1. On the Visual Studio 2010 file menu, choose New Project.
  2.  From drop down list .NET Framework choose .NET Framework 2.0 or 3.5 or 3.0
    Picture 1. How to create Web Service in ASP.NET
    Picture 1. How to create Web Service in ASP.NET

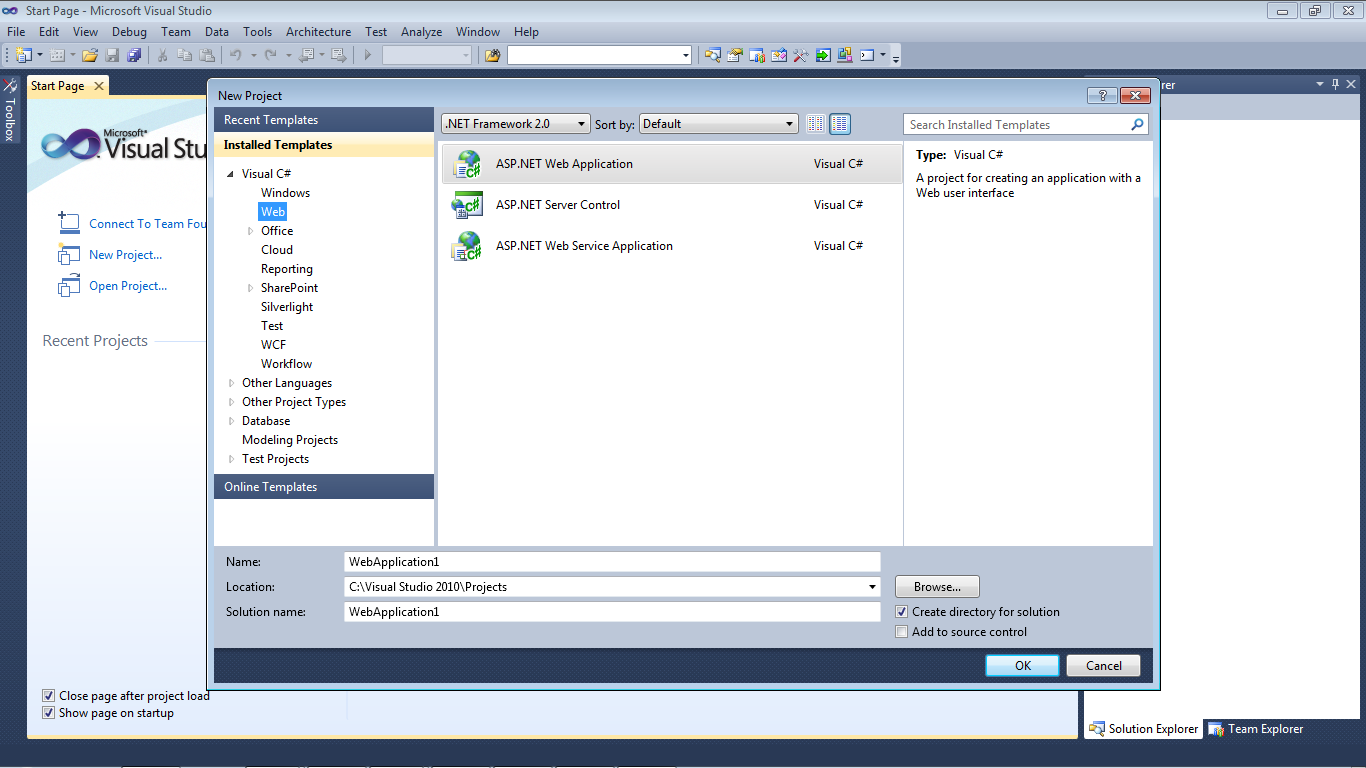
  3. From menu Recent Templates choose -> Visual C#->Web.


Picture 2. How to create Web Service in ASP.NET

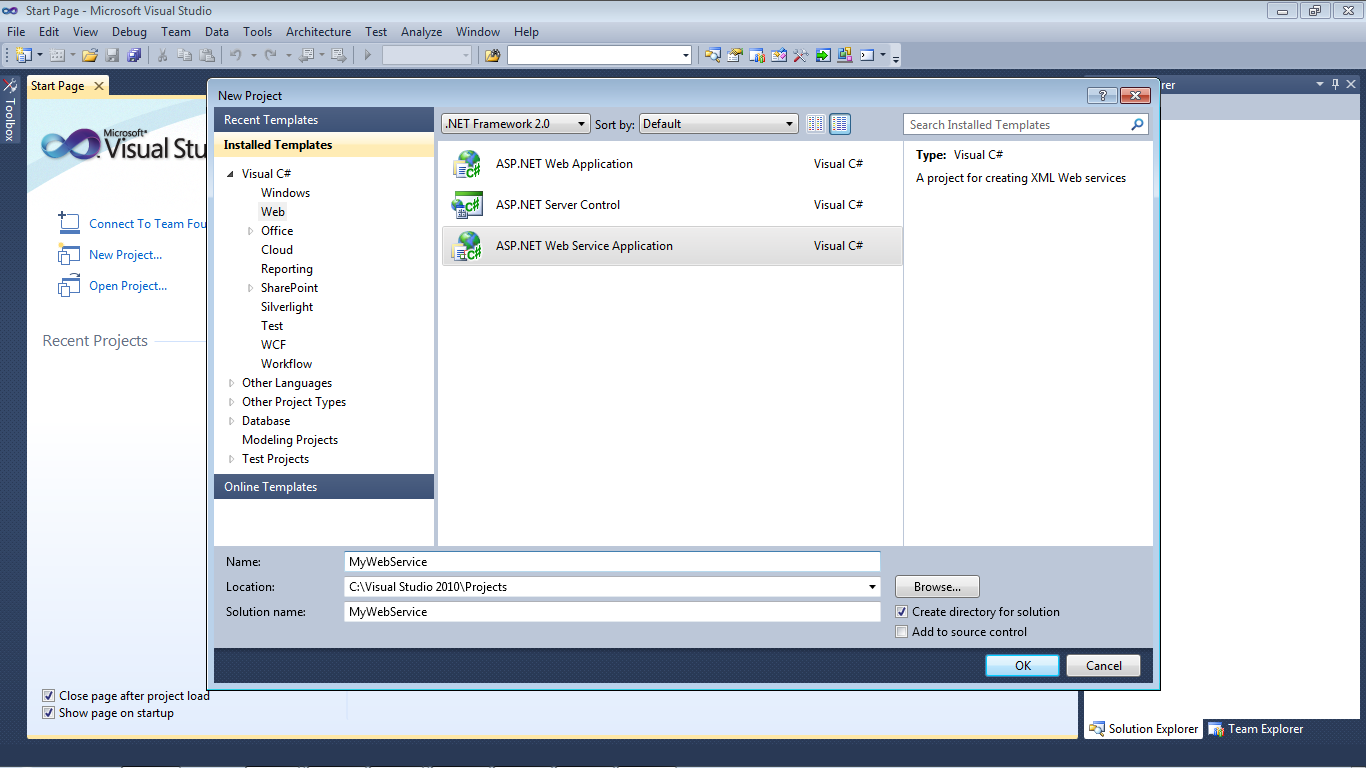
  • Go to on the right pane and click on ASP.NET Web Service Application.
  • Enter the name of the web service in the Name text box and click OK.


Picture 3. How to create Web Service in ASP.NET

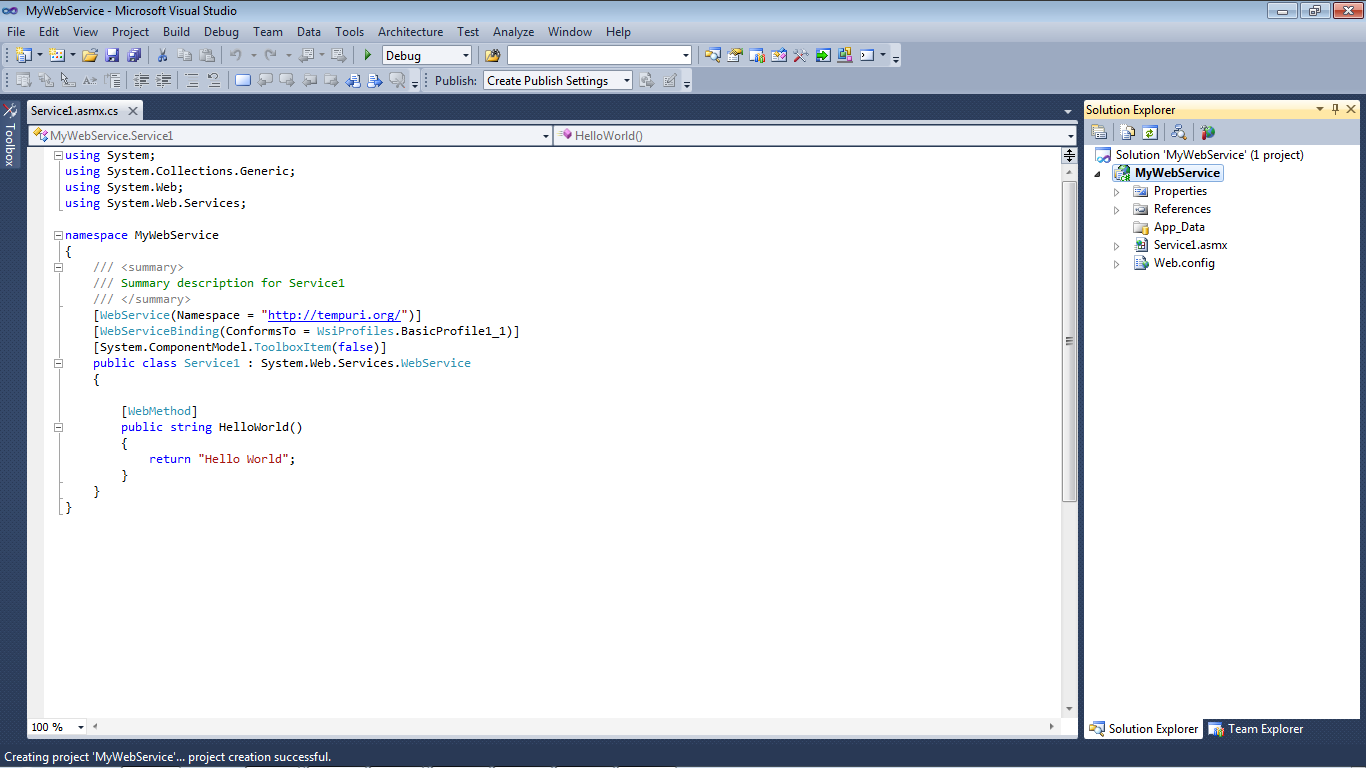
Visual Studio .NET creates a project that contains  a .asmx file and code-behind class that provides required functionality.


Picture 4. How to create Web Service in ASP.NET

So here by default one method is already created with name helloworld and you can create more method as you can  but remember  always put this line on each and every method that to want to call through web service.
[WebMethod]
Video on web service


Apr 28, 2012

Sending Emails In ASP.NET

Views:

http://www.howtoasp.net/how-to-asp-net-uploads/2011/06/sendmailapsnet.png
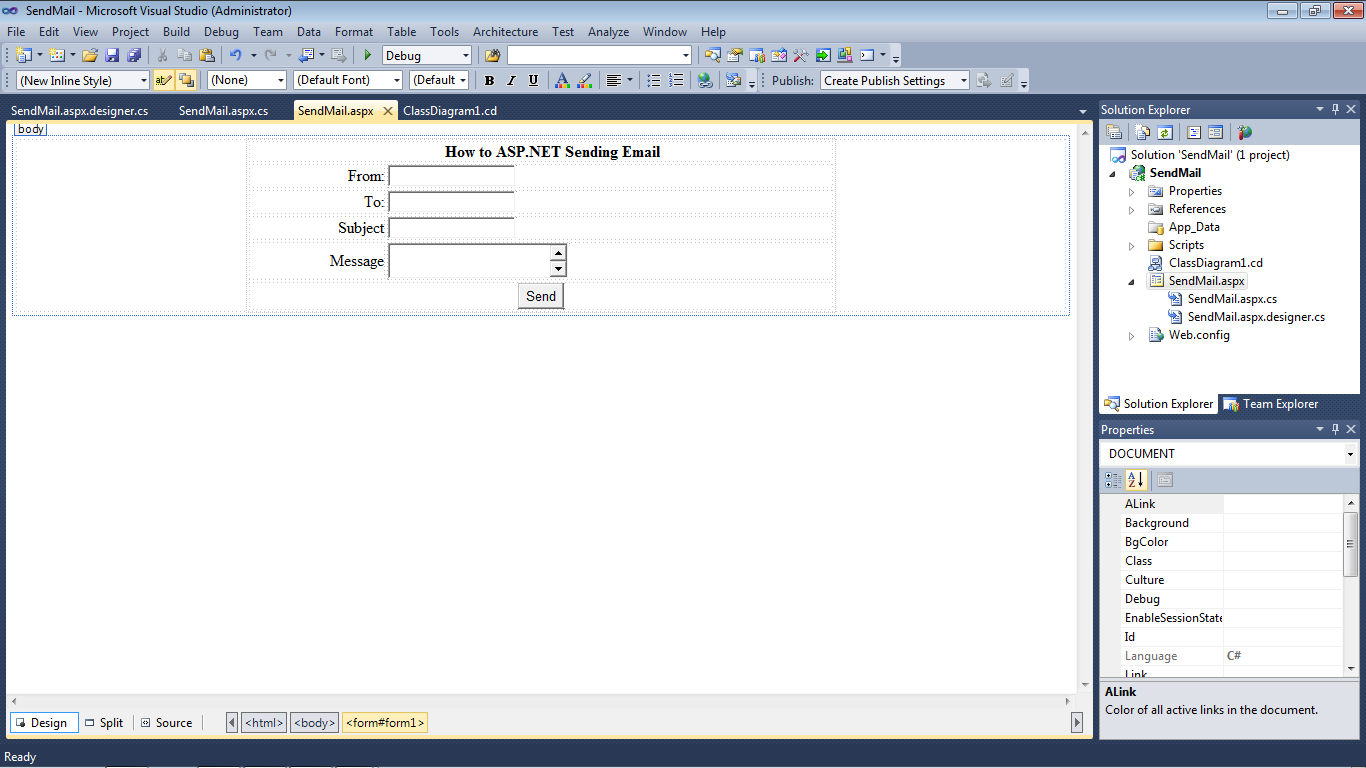
TO day i am show you how to send email in asp.net with out any email hosting or smtp server.How ? .We can send email by using over personal email account like (Hotmail,g mail,yahoo mail) in asp.net all we have required a server port number , id and password . Demo Project is Availible you can download it but please note you have to provide your on information(email id and Password) in web.config file .

Following Some Code Demonstration

the email using the SmtpClient class. The namespace System.Net.Mail contains classes which take care of constructing an SMTP-based message. The System.Net.Mail.MailMessages class encapsulated constructing a SMPT-based message, and System.Net.Mail.SmtpClient class provides the mechanism for sending the message to an SMTP server.
using System;
using System.Net.Mail;
using System.Collections.Generic;
using System.Linq;
using System.Web;
using System.Web.UI;
using System.Web.UI.WebControls;
public partial class _Default : System.Web.UI.Page
{
protected void Page_Load(object sender, EventArgs e)
{
}
protected void sendbtn_Click(object sender, EventArgs e)
{
SmtpClient smtpClient = new SmtpClient();
MailMessage message = new MailMessage();
try
{
/*
MailAddress fromAddress = new MailAddress(tb_email.Text, tb_name.Text);
// You can specify the host name or ipaddress of your server
// Default in IIS will be localhost
smtpClient.Host = "smtp.mail.yahoo.com";
//Default port will be 25
smtpClient.Port = 587;
//From address will be given as a MailAddress Object
message.From = fromAddress;
// To address collection of MailAddress
message.To.Add("zainnedian@yahoo.com");
message.Subject = "Contact us ";
// CC and BCC optional
// MailAddressCollection class is used to send the email to various users
// You can specify Address as new MailAddress("admin1@yoursite.com")
//message.CC.Add("admin1@yoursite.com");
//message.CC.Add("admin2@yoursite.com");
// You can specify Address directly as string
//message.Bcc.Add(new MailAddress("admin3@yoursite.com"));
//message.Bcc.Add(new MailAddress("admin4@yoursite.com"));
//Body can be Html or text format
//Specify true if it is html message
message.IsBodyHtml = false;
// Message body content
message.Body = tb_emailbody.Text;
// Send SMTP mail
smtpClient.Send(message);*/
var mailMessage = new System.Net.Mail.MailMessage();
mailMessage.To.Add("zainnedian@yahoo.com");
mailMessage.CC.Add("ssajjadashraf@yahoo.com");
mailMessage.Subject = "FeedBack Contact From User"+tb_email.Text;
mailMessage.Body = "User name :"+tb_name.Text+"\n\n Mesasge :"+tb_emailbody.Text;
var smtpClient1 = new SmtpClient();
smtpClient1.EnableSsl = true;
smtpClient1.Send(mailMessage);
lb_status.Text = "Email successfully sent.";
}
catch (Exception ex)
{
lb_status.Text = "Send Email Failed." + ex.Message;
}
}
}
WEB.CONFIG FILE CODE
EMAIL Sending Code in Aps.net

Download Source Code

Sep 29, 2011

Delete a seleted row from a DataGrid using c# windows application

Views:

Place a DataGrid on the form and populate it, now double click the dataGrid and use the below code.


private void DataGridvie_selected(Object sender, EventArgs e)

    {

        DataSet da = new DataSet();

        //when you select a row that index will storing in i variable

        int j = datagrid1.selectedIndex;


        int empidval = ds.Tables["emp"].Rows[j][0].ToString();

        //above what you had selected that row value exa:empid has 101 is stored in empidval vairable


        //write the delete query


        SqlConnection conn = new Sqlconnection("conn string");

        conn.Open();

        SqlCommand cmd = new SqlCommand("delect emp where empid=" + empid + "", conn);

        cmd.ExecuteNonQuery();

        MessageBox.Show("Row Deleted");

    }


How to get the Values of Selected Cell Row DataGridview(Windows Appliction) using C# ?

Views:

Open Windows Form.Add on DataGridview and the three Textboxes on the Windows Form.
In the above example I am creating it on emp table and my 3 columns are
id number,empname(varchar (20),salary number(20).
In form load Retrive the data a emp Table and fill in the Datagridview.


When you click or Select a Row on DataGridview the particular selected row values
will display in Textboxes when we use the following code.
int i;
i = dataGridView1.SelectedCells[0].RowIndex;
textBox1.Text = dataGridView1.Rows[i].Cells[0].Value.ToString();
textBox2.Text = dataGridView1.Rows[i].Cells[1].Value.ToString();
textBox3.Text = dataGridView1.Rows[i].Cells[2].Value.ToString();

before using this code you have to double click your DataGridview and write the 
code in
between the 

Private void dataGridView1_CellContentClick_(objectsender,DataGridViewCellEventArgs e)
{  //write above code here...

}

when you selecte a row in datagrid ,the selected row Values will display in text boxes. Below is the output image:

below is the complete code:
using System;
using System.Collections.Generic;
using System.ComponentModel;
using System.Data;
using System.Drawing;
using System.Text;
using System.Windows.Forms;
using System.Data.SqlClient;
namespace WindowsApplication1
{
    public partial class Form1 : Form
    {
        public Form1()
        {
            InitializeComponent();
        }
        SqlDataAdapter da;
        DataSet ds;
        int i;
        SqlConnection conn;
        private void Form1_Load(object sender, EventArgs e)
        {           
            conn = new SqlConnection("connetion tring");
            conn.Open();
            da= new SqlDataAdapter("select * from emp", conn);
            SqlCommandBuilder builder = new SqlCommandBuilder(da);
            ds = new DataSet();
            da.Fill(ds, "emp");
            dataGridView1.DataSource = ds.Tables["emp"];
        }

Private void dataGridView1_CellContentClick_1
(objectsender,DataGridViewCellEventArgs e)
    {
i = dataGridView1.SelectedCells[0].RowIndex;
textBox1.Text = dataGridView1.Rows[i].Cells[0].Value.ToString();
textBox2.Text = dataGridView1.Rows[i].Cells[1].Value.ToString();
textBox3.Text = dataGridView1.Rows[i].Cells[2].Value.ToString();
  }
}

how to add CheckBox inside DataGridView in windows application

Views:

This article will explain you how to insert Checkbox inside DataGridView in windows application. This article is for beginners.

First create a windows application from Visual Studio Menu File->Project-> Then select C#->Windows Form Application.


Then add DataGridView from toolbox of Visual Studio. And also add One Button to test the CheckBox Value inside DatGridView.

Now from the property window of DataGridView Select the Columns Property.
You will see this screen:


Click on the (Collection) button from the above shown window.
You will see the below screen:


From this window click on "Add" button.
You will see below window:


From the above window select "Type" as "GridViewCheckboxColumn" Column as shown in above window
Then press Add Button from above Window.
Now you have added the checkbox DataGridView in windows application. Now it's time to add some code in your .cs file .

Now create one function, which will return a DataTable with sample data containing in it. This Data Table  will bind to DataGridView.
  /// <summary>
        /// Create DataTable to add to DataGridView
        /// </summary>
        /// <returns>DataTabe</returns>
        private DataTable SampleDataTable()
        {
            DataTable dt = new DataTable("MyDataTable");
            //Create columns and add to DataTable;
            DataColumn dcID = new DataColumn("ID");
            dt.Columns.Add(dcID); //ID column created and add to DataTable
            DataColumn dcSomeText = new DataColumn("SomeText");
            dt.Columns.Add(dcSomeText); //LastName column created and add to DataTable
            //Now Add some data to the DataTable
            DataRow dr;
            for (int count = 0; count <= 9; count++)
            {
                dr = dt.NewRow();
                dr["ID"] = count;
                dr["SomeText"] = "Some Text " + count;
                dt.Rows.Add(dr);
            }
            return dt;
        }

On the FormLoad_Event add this line of code to bind SampleDataTable() as a datasource of of windows application like this
private void Form1_Load(object sender, EventArgs e)
{
      myDataGridView.DataSource = SampleDataTable();
}

Now on Button click Event add this line of code to check what all rows user has selected from DataGridView.
private void btnSubmit_Click(object sender, EventArgs e)
{
     foreach (DataGridViewRow dr in myDataGridView.Rows)
     {
         if(dr.Cells[0].Value != null) //Cells[0] Because in cell 0th cell we have added checkbox
          {
                    MessageBox.Show("Rows " +dr.Index + " selected");
          }
      }
}
Now, its time to run the application,once you run your application you will see the output window like this:


Now, select the check box and press the Get Selected Rows Button. You will see this window:

Happy Coding!!!

Sep 28, 2011

Store and Retrieve Images in Data Base using Microsoft .NET

Views:

 Download Code
OR
DOWNLOAD CODE (Reommended)

There is No Direct method To Store and Retrieve Images in Data Base Or SQL Server . But Using Following Method We Can Easily Store and Retrieve images from SQL Server .


Tools Used

  • SQL Server 2000
  • Microsoft .NET Version 1.1
  • C# (Windows Forms based application) 

Jun 30, 2011

In C# - How to save user settings

Views:


Description :

Instead of working with custom INI files save user settings using the .Net Framework

 Tools Required : 
To Use this Language there is tool which created by Microsoft is Visual C# 2010 Express.
To Download the Visual C# 2010 Express By Microsoft please CLICK HERE or Can also Download from Microsoft Website


ANY QUERY FREE TO ASK ME 

Jun 25, 2011

Creating Reports in C# - Part 2 of 2

Views:

Description :

Quick and easy way to pass parameters to reports in C#


Tools Required : 
To Use this Language there is tool which created by Microsoft is Visual C# 2010 Express.
To Download the Visual C# 2010 Express By Microsoft please CLICK HERE or Can also Download from Microsoft Website


ANY QUERY FREE TO ASK ME

Creating Reports in C# - Part 1 of 2

Views:


Description :
Quick and simple way to create report from data in SQL server, in Visual studio using
C#.
 
Tools Required : 
To Use this Language there is tool which created by Microsoft is Visual C# 2010 Express.
To Download the Visual C# 2010 Express By Microsoft please CLICK HERE or Can also Download from Microsoft Website


ANY QUERY FREE TO ASK ME 

Using the DataTable RowFilter Property in C#

Views:


Description :
This is a simple but pretty important property that filters data already existent in the dataTable according to dynamic values. Download the SQL database used in this video from www.innermotivation.com/database
 
Tools Required : 
To Use this Language there is tool which created by Microsoft is Visual C# 2010 Express.
To Download the Visual C# 2010 Express By Microsoft please CLICK HERE or Can also Download from Microsoft Website


ANY QUERY FREE TO ASK ME

Become a Fan

visual studio learn